Saturday, July 31, 2010

Gold Stars, Ink.!

I recently promoted to Sr. Consultant, so my team and I were able to choose a Group Name. We chose Gold Stars, Ink. and I was also able to start a private group on the Stampin' Connection website so we can share information and ideas with each other easily.

When I joined as a demonstrator two years ago, I never guessed how much fun I'd have sharing what I love with others and seeing them create with me. I never guessed that I'd make so many new friendships either. I love stamping and creating with people. I joined for the discount, and to try to get some of the things I wanted for free (not out of the household budget). I never guessed how much I would learn... each month I try out new things to share with my friends and customers. I actually make money doing something I love in my spare time! How great is that? I didn't know about all the opportunites Stampin' Up! has to share with the demonstrators. This year, we have the opportunity to earn the Incentive Trip to Disney World, and I would love to be able to take my family there for free. I'll need to work hard, but it's a goal I've set for myself. I have until next June to earn it through sales and my downline.


August is a great month to join my Gold Stars, Ink team. Both you and I would get a free upgrade to Expedited Shipping for our orders in September (two days to arrive to my house vs. the week it takes normally) and you would qualify for the 1/2 price admission to the Stampin' Up! Regional in Hamilton, ON September 25th. Anyone in Canada can join my team. It's easy on my website with my recruiter password: gold star. Please contact me for more information, or with any questions you have. I have a private blog with instructions and ideas for hundreds of cards sorted by stamp set. I also offer a free class each month to my team members (either my Scrapbook Class or my Technique Class) and I hold team meetings every other month with make & takes, information and an optional swap. Registration for the Hamilton Regionals starts August 4th, and spaces are limited so if you are interested in that promotion, time is of the essence. This is a great day of fun and learning, and I'm hoping most (or all) of my team will be able to join me!

You can also help me reach my goal by hosting a home workshop or party (in my home or yours). For anyone who books a party date before September 30th, I'm offering an extra $10.00 in hostess benefits as my gift to you. I offer card parties, scrapbook parties, project (3-d) parties, and home decor parties for you and your friends. It's a fun night out for you and your friends, and you can earn free product too! All through August, a hostess with a party over $450.00 in product will get an extra $35.00 in hostess product of their choice!

And now, since you made it through all that talking, I'd like to share another card I've made with new products from the catalogue!


This card is 5.25" x 5.25" and fits in our Medium Square envelopes. I used the new stamp set Artistic Etchings and new colours (Crumb Cake, Marina Mist, Early Expresso and Pear Pizazz). This card was based on FTL #56 from the Clean & Simple Blog.

Stamps: Artistic Etchings, Teeny Tiny Wishes
Inks: Marina Mist, Early Expresso
Cardstock: Crumb Cake, Marina Mist, Early Expresso, Pear Pizazz

Friday, July 30, 2010

Butterfly Prints


Another card with more of my must haves from the new catalogue: Butterfly Prints stamp set (I stamped the bodies on the background and on the butterflies so I wouldn't have to cut them out), Elegant Lines Textured Impressions Folder and the Basic Pearls.

I've made myself a little tool to make working with the tiny pearls and rhinestones easier.... I wrapped a glue dot around the end of a toothpick. I can use it to push the pearl off the backing sheet it comes on, and then put it in place and apply a little pressure to get it where I want it on my project. When I'm not using it, I just put a piece of the glue dot backing paper around it so it doesn't stick to everything.

Stamps: Butterfly Prints
Inks: Rose Red, Daffodil Delight, Marina Mist
Cardstock: Naturals White, Rose Red, Pretty in Pink, Daffodil Delight
Punches: Scallop Edge, Butterfly, 2 x 1 3/8" Oval
Other: Elegant Lines Textured Impression Folder, Basic Pearls, Stampin' Dimensionals

Wednesday, July 28, 2010

Aviary Z-Fold

On my first browse through the catalogue when I first received it, I really liked Aviary, but it wasn't on my 'must-have first' list. Unfortunately for me, it really grew on me very quickly, especially after seeing all the cute things other people are making with it! So, of course I have it now... in the wood mount version so I can use my Stamp-a-ma-jig with it easily.


This is the first card I've made with this set (and Fabulous Phrases - another set from my 'must-have first' list). It's a z-fold card (4 1/4" x 11" - scored @ 2" and 5 1/2") with different cages and birds stamped on each panel--can you tell I wanted to use them all? I also used my favourite (by far) new accessory, the Basic Rhinestones to glam up the cages.

Stamps: Aviary, Fabulous Phrases
Inks: Tempting Turquoise, Rose Red, Pear Pizazz, Soft Suede, Chocolate Chip, Jet Black StazOn, Concord Crush, Rich Razzleberry, Wild Wasabi, Pumpkin Pie
Cardstock: Naturals White, Pink Pirouette, Crumb Cake
Punches: Modern Label, Dotted Scallop Ribbon Border
Other: Stamp-a-ma-jig, Basic Rhinestones, 1/4" Daffodil Delight Taffeta Ribbon

Monday, July 26, 2010

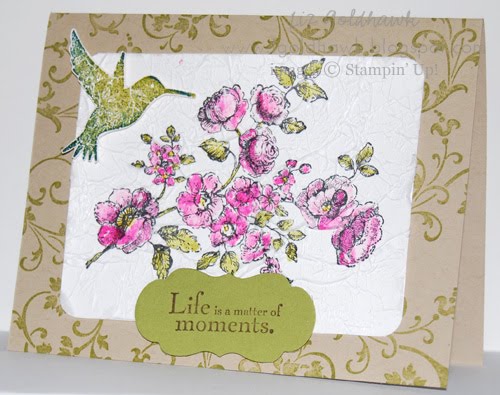
Faux Silk Elements of Style


I wanted to update some of my technique samples, and since I used Embrace Life (retired in June) for my Faux Silk sample, I thought I'd use Elements of Style to create a new sample.

This technique is very easy, and looks great too.

1. Stamp an image on light coloured tissue paper (I used Jet Black StazOn). The tissue paper should be larger than you want your finished piece to be.
2. Colour the image if desired (I used Blender Pens and my ink pads).
3. Crinkle up the tissue paper into a little ball, then open up, but don't flatten too much.
4. Cut a light piece of card stock the size you want your finished piece to be.
5. Apply glue (a glue stick works best) to the whole piece of light card stock.
6. Push the wrinkled tissue paper down onto the glue-covered card stock. I start in the middle, and push straight down with my palms. You want to avoid smoothing out the wrinkles, just push them into the glue.
7. Wait a few minutes for the glue to dry, and then trim off the excess tissue paper

Stamps: Elements of Style
Cardstock: Crumb Cake, Old Olive, Whisper White
Inks: Old Olive, Early Expresso, Not Quite Navy, Melon Mambo, Jet Black StazOn
Other: Tissue Paper, Lots of Tags Sizzlet, Corner Rounder Punch, Iridescent Ice Stampin' Emboss Powder, Blender Pen, Daffodil Delight Stampin' Write Marker

Saturday, July 24, 2010


Watercolor Trio is my favourite set from the Summer Mini and this card is fairly quick & easy... I inked the stamps with Stampin' Write Markers (Old Olive, Rich Razzleberry, Daffodil Delight, Melon Mambo) and then stamped on Crumb Cake cardstock. The leaf stamped was just inked with Crumb Cake so it would stay in the 'background'. I paper pierced both sides of the Crumb Cake cardstock and then added the scallop border in Rich Razzleberry c/s. The sentiments from this set fit perfectly in the 1 3/4"x7/8" Oval punch and I layered that with the scallop oval punch. I attached the whole piece to the Melon Mambo card base with dimensionals.

Watercolor Trio is available in the Summer Mini, so you can order it until August 31st.

Tuesday, July 20, 2010

Fast & Fabulous CASE


My team member Yvonne made a card very similar to this at her Open House a month or so ago, and I liked it so much I had to make my own! I did change up the colours a little and the sentiment is different, but everything else is pretty much the same. The stamp set is Fast & Fabulous, a Level 2 Hostess set. If you'd like to get this set for free, I'd love to book a private class or party with you! I love the texture added by the Vintage Wallpaper Textured Impressions Folder.

Stamps: Fast & Fabulous, Perfect Punches
Inks: Pear Pizazz, Perfect Plum, Concord Crush
Cardstock: Pear Pizazz, Concord Crush, Very Vanilla
Punches: Scallop Trim Border, Curly Label
Other: Vintage Wallpaper T.I.F., Stamp-a-ma-Jig

Thursday, July 15, 2010

July Technique - Black Magic Card 2


Well technically, I guess this would be Expresso Magic, since I used Early Expresso instead of Basic Black for the focal image... I had thought about doing Black Magic for the June Technique Class, but then I saw this new set (Just Believe) in the new catalogue, and new I had to wait for July so I could use it! I think this might be my favourite new set. I love silhouette images, I love sets with images and sentiments, and I love flowers! This set has all of the above. I also used my new favourite accessory from the catalogue... the Basic Pearls. I love that they are smaller than most of the half-back pearls that used to come in the Pretties Kit, I love that they are self adhesive, and I love that they are only $6.50 for a whole sheet of them in various sizes!

If you'd like to make this card (and the one in my previous post) I have a few spots available in my Sunday classes (1:00pm or 7:00pm). My Friday Class is full! Please contact me for more details.

Stamps: Just Believe
Inks: Whisper White (Craft), Concord Crush
Cardstock: Certainly Celery, Concord Crush, Early Expresso, Very Vanilla
Other: Modern Label Punch, Very Vanilla Satin Ribbon, Basic Pearl, Watercolour Pencils, White Signo Gel Pen