Showing posts with label Paper Pumpkin. Show all posts

Sunday, June 29, 2014

June Paper Pumpkin Bonus Projects - Pinwheel Party

 The June Paper Pumpkin Kit is called Pinwheel Party and came with the supplies to make 24 pinwheels! They were pre-cut and punched and you can attach them to the paper straws or to the treat bags (also included in the kit). Here's the picture from the kit:


I wanted to make some cards with the kit too... and everyone who gets their Paper Pumpkin kit from me gets any extra supplies and instructions  to make them too! 
For the first one I cut 5/8" off each side of the pinwheel and re-punched holes in the corners to make the pinwheel. I love the stamps in this kit and stamped them around the outside of the white card stock.

This card was CASE'd from one Amy Kunckle made...

I wanted to get away from the red, white & blue theme so I used the blue and grey patterned pinwheel and cut it into strips, and then used Tangelo Twist as my third colour... the big star is from Be the Star.

For this card, I cut the pinwheels apart into triangles (4 triangles), and then cut the triangles in half (8 triangles), and then in half one more time (16 triangles). I created this chevron pattern, then used the stamps around the outside (so easy to do with the photopolymer stamps in the kit)!

This card wasn't one of  the bonus projects included for my subscribers, but I wanted to show it. I was inspired by quilt squares. I used the same sized triangles from the card above to create this 5 1/4" x 5 1/4" card. The quilted panel is 4 1/2" x 4 1/2".

Thanks for looking!

Saturday, June 21, 2014

May Paper Pumpkin Bonus Projects - Hey, Man

I received my June Paper Pumpkin Kit this week, and realized I hadn't shared my May Paper Pumpkin Bonus projects yet! I really liked the stamps in the May Kit and will get a lot of use out of them. I also really liked the colour combination and the pattern on the 3x3 cards.

If you'd like to sign up to get the Paper Pumpkin kit sent to your door each month (I love getting Fun Mail!), you can subscribe through me and get the supplies and instructions to make the bonus projects each month. You can use this link: Join Now! You can also pre-pay for the kits as  a regular order item (1 month, 3 month, 6 month or 12 month)... they make a great gift!


 These were the two cards in the kit (supplies for four of the large one, two of the small one). I made one of each, then used the rest of the supplies to make the rest shown below.

 I added some Island Indigo Bakers' Twine for this card, and the blue zig zag piece is the outside part of the stickers.

Mary Fish made a card like this with her kit, and I loved it and had to make one myself! I added the punched stars and the sentiment starburst to the supplies in the kit.

 This card was created by Julie Davison, and I loved it and copied it! The green and patterned sections is the 3x3 note card (score line hidden by sentiment banner).

 This was the second 3x3 card I made... blue starburst and sentiment circle were added to the kit supplies.

This was the last card I made with the kit. The blue zig zag is the outside section of the sticker, and the patterned piece is left from the 3x3 card I used for the card two up in this post.

I am having a Paper Pumpkin Party on Thursday, July 3rd if you want to come learn more about these kits! I'll be giving away one of the Hey, Man kits to someone at the event, so you could make your own set of these cards! Register by Wednesday, July 2nd

Tuesday, April 29, 2014

April 2014 Paper Pumpkin Kit - Framed Love

This month's Paper Pumpkin kit included three stamps (a pattern, Happy Mother's Day and For You), two ink spots, a frame, two text banner stickers, 12 tags, several hearts of different sizes, two buttons and Linen Thread. The project shown in the kit is below:


Anyone who subscribes to the kit through me also got the supplies and instructions to make the projects below:
 A few tag ideas


Three cards

 And a panel that can replace the one you make with the kit.

Friday, March 28, 2014

March Paper Pumpkin Bonus Cards

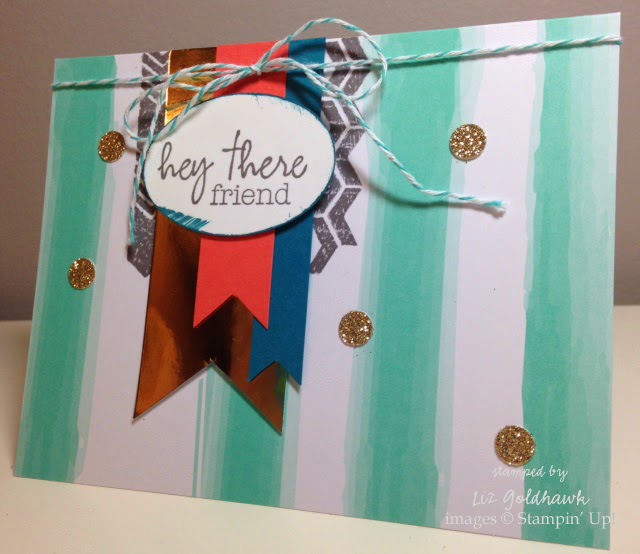
I think this might be my favourite Paper Pumpkin kit yet! I love the pattern on the card bases, I love how easy it was to line up the patterned Photopolymer stamps, and I loved the touch of glitter and shine (the gold envelope liners were a fun bonus and it was easy to cut a bit off the bottom to use on the cards). And the wood sentiments!!! So fun! So, here's what I came up with, using the supplies from this kit, a few things from the first kit everyone gets (I used the Hey There, Friend stamp and Basic Gray ink spot), and a few extra bits and pieces I send out to everyone who gets their Paper Pumpkin kit from me (these went out in the mail today... e-mail instructions are almost done).

These are the cards Stampin' Up! designed with the kit:
 I punched the gold 2 1/2" circle from one of the gold envelope liners:
 more gold strips from the envelope liners, and I used both of the stamps and ink spots to add colour and pattern to the base:
 I added a Scallop Top Tag, and stamped all over with one of the stamps in the kit:
 This one uses the sentiment and ink from the first kit everyone gets, and a few strips of co-ordinating card stock, plus a little bit of Baker's Twine.
I folded the front (printed) side of the card base at 2 1/8" so it would fold back to make this Z-fold card. I used both stamps and inks (I love how easy it was to line up the chevron pattern on the Calypso Coral oval I added):
For this one, I cut a strip from the card front to add to a Crumb Cake card base. I added a torn strip of card stock and some gold banners cut from the envelope liner. I also cut the wood sentiment word apart to get a different look:
This one uses the rest of the printed card front (left from the card above) and I added an embossed piece of Island Indigo card stock as well as a Naturals White card base. The wood sentiment is layered over a strip of gold cut from the envelope liner:

I hope you like what I did with the kit this month! Don't forget that if you sign up by March 31st, you'll get a pack of 2012/14 In Color Markers ($19.95 value) for free! And if you sign up through me, you'll get the supplies and instructions to make bonus cards every month!

Monday, March 17, 2014

March 2014 Paper Pumpkin Kit


I got my March Paper Pumpkin kit today, and I'm so excited to play with it! We get supplies to make eight super cute cards, and of course I can't just follow the 'rules' (or instructions in this case) and my mind is already coming up with some other super cute ideas using the supplies! I love the stamps, the wood sentiments and the watercolour stripe card bases. Super cute colour combo too! Stay tuned... I'll share what I come up with... for now, you can see the cards designed by Stampin' Up! in the video.

Monday, March 3, 2014

February Paper Pumpkin Bonus Projects

February's Paper Pumpkin kit included five gift bags, die cut bermuda bay circles, alphabets and starbursts and two photopolymer stamps (stripes and dots) and a Pistachio Pudding ink spot, as well as white grosgrain ribbon and Baker's Twine. If you subscribe to the kit through me, you'll get the supplies, instructions and photos to make the bonus projects too!

On this bag, I stamped the patterned circles with Pistachio Pudding ink. 

On this bag, I glued the circles, stamped starbursts and letters directly to the bag instead of hanging them from the twine with the clothespins.

On this bag, I punched out the letter circles from one of the alphabet sheets, then glued it to the bag. I used the Pistachio Pudding ink on the back of the Bermuda Bay circles, then cut the leaves. I flipped over three letter circles to use the white side. I punched some flowers from one of the bags (after I cut it apart for other projects).

 This card uses pieces cut from one of the bags. I tied the twine through the grommets of the bag after stamped the pieces with Pistachio Pudding ink and the splatter stamp from the Welcome Kit (the first kit you get when you sign up). The sentiment is also from the Welcome Kit. Bermuda Bay card stock was embossed with the Decorative Dots embossing folder.

This card also uses a piece from the bag I cut apart. I made a tag (stamped with the splatters again). I glued on the Bermuda Bay circles and the stamped starbursts to the tag. The sentiment was stamped on the back of a Bermuda Bay circle. 

I had one more piece left from the bag I cut apart, so I created this tag! I stamped the tag with the patterned circle stamps from the kit. I layered the circle, stamped starburst and letter circles.

I hope you enjoyed my bonus projects this month!

Wednesday, February 5, 2014

January Paper Pumpkin Bonus Projects

I really liked the January Paper Pumpkin kit... the card bases were die cut with peekaboo windows, and you could use the patterned side or the crumb cake side with the colour peeking through. The stamps were cute too, and there were lots of card stock stickers and four paper doilies. The kit came with four card bases, so I created two as they were shown in the instructions:

I cut apart the two remaining card bases to make four more cards (so six total) and still had stickers and doilies left over. Here are the four extra cards I created:
For this card, I added a Naturals White card base, a 2 1/2" circle of Silver Glimmer Paper and the stamped and die cut sentiment from Starburst Sayings.

For this card, I cut around the 'leftover' sticker outlines from several of the hexagon stickers in the kit. This kit came with a free gift of the In Color Boutique Details which co-ordinate perfectly with the kit, so I used two of those as well. Other than that, I just added the Strawberry Slush card base.

For this card (I was trying to keep it more masculine and simple... but then I realized that it uses Calypso Coral which isn't really a masculine colour.... so I'm not sure I succeeded). I only added a Crumb Cake card base to the kit supplies.


This card also only uses kit supplies other than the Basic Grey Card base.

If you like what you see, this is the perfect time to try out the Paper Pumpkin Kit. If you sign up by February 10th, you'll get a free pack of 2012/14 In Colour Markers ($19.95 value). Your kits ship right to you around the middle of the month, and if you choose me as your demonstrator, I mail you the supplies and e-mail the pictures and instructions for you to make the bonus projects by the end of each month!

Thursday, January 2, 2014

December Paper Pumpkin bonus projects

Happy New Year! The Occasions Catalogue goes up tomorrow, and I'm excited to show you what I've made so far with some of those products, but I want to show you what I made with the December Paper Pumpkin kit first!

The kit was to make a Real Life Journal, and before I assembled that, I cut a 1" strip from one edge of one sheet of each of the patterned papers in the kit (there were two of each pattern). Then I added a few card bases, a little Pumpkin Pie patterned paper (Polka Dot Basics) and a Hello stamp from the Thanks & Hello set. This is what I created:
The first two were copied almost exactly from the Stampin' Up! blog (Dec 26th post - I can't pull it up right now to see who created them).


There was also a card on that blog post that had diagonal strips with the arrows stamped, but I changed it up a bit and added the speech bubble and wood accent...

The next card was CASE'd from a card made by Kim Ryden... loved the blocks of paper!

And this one I came up with myself... I wanted to use the chipboard letters (punched from the cover of the album to create negative space letters - Real Life). I really like the arrow background, and I really like the chipboard combined with the banner word below, but I don't know if they really work together... I think I should have used a different card base colour. Anyway, I thought I'd still share, since it's the only one I came up with myself! 


Friday, November 1, 2013

October Paper Pumpkin Bonus Cards

When I receive my Paper Pumpkin each month I challenge myself to create some alternate projects with the supplies (you can see past projects if you click the Paper Pumpkin tag at the end of this post). I send the supplies, instructions and photos to everyone who has subscribed to the kit through me so they can make them too! This month I felt more challenged than normal when I opened up my box... this was the project included in the kit:
It's a very cute (and easy to put together) memo board. However, there wasn't anything left over or even papers I could cut apart to use on my alternate projects. There were only word stamps too, which made it even more challenging for me. After some Google-ing, I found my inspiration (gotta love Stampin' Connection and demonstrators who share) and came up with these three bonus cards:


I'm happy with what I came up with, and hope you like them too!

Monday, September 2, 2013

August Paper Pumpkin Bonus Cards!

I had a lot of fun with the August Paper Pumpkin kit... I love the bicycle stamp! A perk for people who subscribe to the Paper Pumpkin kit with me is I send them instructions, photos and extra supplies to create bonus cards with the stamps and products in the kit. The only other supplies they may need are the stamps and ink spot from the Welcome Kit (everyone gets that their first month) and adhesive. Card 1 is always the card made with the instructions in the kit. These are the four bonus cards for this month:

 (a bit of a tweak from the original design... made the card horizontal, and used a strip of the Raspberry Ripple card stock sticker instead of the banners)

(love how well the Birthday Basics patterned paper co-ordinates with the stamp)

 (this was a CASE from Julie Davison)

(I folded the Crushed Curry sticker strips in half, then cut a 'v' at the bottom to create another pennant type. This card also uses the stamps from the Welcome Kit)

I hope you like these variations!