Friday, July 31, 2009

Sketch #67

this is a 12x12 multi-photo sketch (or you could do one photo and multiple paper blocks):


and I decided to make a card this week:


supplies (all SU!): Stamps, patterned paper and rub-ons are all from the Lovely Flowers Bundle (Level 3 hostess); Cardstock (Melon Mambo, Kraft, Very Vanilla); Inks (StazOn, Melon Mambo, Old Olive, Rich Razzleberry); Pretties kit flower (coloured with Aqua Painter and Razzleberry ink) and crystal brad; Paper Piercer and Mat Pack.
Link me up in the comments if you create something based on the sketch! I'd love to see...

Thursday, July 30, 2009

Medallion


When I first got my new catalogue, I noticed the card set on the cover and loved it. Flipping through the catalogue a bit more, I kept noticing cards using this stamp, and loving them all. So, it's no surprise that Medallion was one of the first stamps I got from the new catalogue.
This is my first card using this stamp... I stamped with VersaMark and used White Stampin' Emboss powder on Rich Razzleberry cardstock. I thought I'd keep this card simple and show off the whole image, so I used a flat backed pearl from the Pretties kit in the middle, and used the Colour Spritzer Tool to add a little Razzleberry speckle to the Kraft background.

Monday, July 27, 2009

Shadow Box Owl card

This card is one we'll be making in my next class (Fancy Folds - August 9th or 10th @ 7:00pm). I CASE'd it from the July Stampin' Success. In the Fancy Folds class, we'll be making five cards that are a litte more involved than a standard A2 card. They all fold flat to fit in an envelope, but some are 3-d, some are different shapes, and some just open differently. I only have a couple spots left in each class ($10.00), so let me know if you'd like to sign up asap!


Supplies (all SU!): Stamps (Owl Together Now); Cardstock (Chocolate Chip, Melon Mambo, Bermuda Bay); Ink (Chocolate Chip); Punches (1 3/4" Circle, 1 3/8" circle, 1 1/4" circle, Scallop Circle, 1" circle, Corner Rounder); Paper Snips, In Colour Stampin' Write markers, Bone Folder, Stampin' Dimensionals

Friday, July 24, 2009

Sketch #66

This two page sketch has 8 spots for photos! Feel free to eliminate some, or replace them with blocks of paper... you could also use only the right side as a one page layout. Here's the sketch:


and my layout (using the BYOM March Kit):


If you create something based on this sketch, I'd love to see it! Link me up...

Tuesday, July 21, 2009

Deal of the Week: Vanilla Hodgepodge Hardware!


Save over 30% off the Vanilla Hodgepodge Hardware ($26.99 - regular price is $41.95!) this week only (until July 26th). This hardware is so pretty, and the best part is it co-ordinates with several of the punches, which makes it so easy to use. On this card, I stamped the sentiment on Kraft cardstock, then punched it out using the Designer Label Punch. The piece fits right inside the label hardware, making it quick and easy to add as an accent!
If you're interested in taking advantage of this great deal (and you're Canadian), e-mail me or click here, then click "Shop Now".

supplies (all SU!): Stamps (Bella Toile, Hugs & Wishes ~ retired), Cardstock (Mellow Moss, Kraft, Chocolate Chip, Baja Breeze ~ retired), Vanilla Hodgepodge Hardware, Aqua Painter, Inks (Chocolate Chip, Kiwi Kiss, Baja Breeze), Designer Label Punch, Colour Spritzer Tool

Thursday, July 16, 2009

On a Pedestal (without a Stamp-a-ma-jig)


So I've shown a few cards using this set, and mentioned that you need a Stamp-a-ma-jig... but this card doesn't use one at all! The secret? Cut out most of the pieces. I stamped the pedestal onto my background cardstock, then stamped and cut out all the other pieces (some on Whisper White, some on Razzleberry Lemonade paper). These images are very easy to cut out... I popped up the bottom and top layers (Bermuda Bay and Melon Mambo) and adhered the word layer directly on the background. I love that the sentiment fits perfectly in the Curly Label punch (also popped up with Dimensionals). I added a couple strips of torn Razzleberry Lemonade papers, and mounted the whole thing on Rich Razzleberry cardstock!

Tuesday, July 14, 2009

July Technique Class!

I had planned on showing 2 Step Stampin' this month, but the stamps I ordered to show this technique haven't arrived yet, so I've moved on to Plan B. August will definitely be 2 Step Stampin'! I've shown Heat Embossing before (I think it was actually the first technique class I did...) so this time I'm showing some techniques that are a little beyond basic embossing... These are the cards we'll be making, and we also do an instruction card with samples on the back for each technique class... here are the details if you'd like to come!

Friday, July 17th @ 7:00 or Sunday, July 19th @ 7:00pm (almost full)
My House (e-mail for more info if needed)
FREE the first time (or if you're in my Stampers' Club) or $5.00 (or $25.00 purchase)
Please RSVP at least 24 hours before class.

The first card shows Emerging Colours. I did a lot of test pieces for this technique, so don't be surprised if they show up on my blog over the next couple weeks... ;) This was my favourite out of the bunch, and it's the card we'll be making!
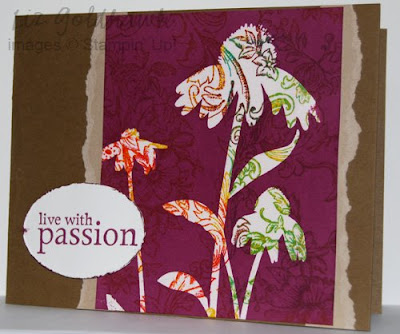
supplies (all SU!): Stamps (Bella Toile, Inspired by Nature), Cardstock (Soft Suede, Kraft, Whisper White, Rich Razzleberry), inks (Crushed Curry, Melon Mambo, Bermuda Bay, Rich Razzleberry, VersaMark), Clear Stampin' Emboss powder, Wide Oval punch

This card shows an accent piece embossed with three embossing powders.

supplies (all SU!): Stamps (Thoughts & Prayers, Circle Circus, Teeny Tiny Wishes), Cardstock (Kraft, Very Vanilla, Rich Razzleberry), Inks (Rich Razzleberry, VersaMark), Punches (Scallop Edge, Modern Label, Scallop Circle), Stampin' Emboss Powders (White, Iridescent Ice, Silver)