Saturday, January 15, 2011

Inlaid Embossing #2 - Circles

Shelli's Creative Challenge this month was to try something new... when I saw samples of this technique, I knew I had to try it!


Another easy card from my technique class this weekend. It's a little more time consuming with all the punching and gluing of circles, but I love the way it turned out. It doesn't look like much until you run it through the embossing folder (Square Lattice). Then it's definitely a 'wow'. You could also use other shapes (flowers, hearts, stars come to my mind right away). This card was a CASE of this card by Lyssa.

I used the Button Embosslit and Button, Button stamp set from the Occasions Mini. I love that they co-ordinate with each other so perfectly!

Stamps: Button, Button, On Your Birthday
Inks: Concord Crush, Pear Pizazz
Cardstock: Crumb Cake, Whisper White, Pear Pizazz, Daffodil Delight, Concord Crush
Punches: Circles (1/2", 3/4", 1", 1 1/4", 1 3/8", 1 3/4"), Decorative Label
Other: Square Lattice Textured Impressions Folder, Button Embosslit

Friday, January 14, 2011

Fast & Fun Friday - Inlaid Embossing

On Fridays, I share something quick & easy to make (under 15 minutes).

This card is one that we're making at my Technique Class this weekend. It also qualifies as quick and easy with the help of the Big Shot. This card is a CASE of a beautiful card I found created by Lyssa. I also tried a new technique (Inlaid Embossing) and used some of my new favourite products (Pear Pizazz Seam Binding & Nature Walk stamp set)... so it qualifies for Shelli's Creative Challenge this month.


I still have some openings available in my Sunday Classes... let me know if you want to come and make this card!

I used the Nature Walk stamp set and the Pear Pizazz Seam Binding from the Occasions Mini Catalogue. This technique is something new I tried (I have a few more to show you over the next little bit) and it's so easy! Just cut or punch cardstock pieces, stick them onto more cardstock, and run it through an embossing folder. This example is right on the card front (I ran the whole card front through), but you can also do smaller pieces and adhere them onto your card after.

Stamps: Nature Walk, Because I Care
Inks: Perfect Plum
Cardstock: Perfect Plum, Naturals White
Other: Top Note Big Shot die, Elegant Bouquet embossing folder, Pear Pizazz Seam Binding, Stampin' Sponge, Perfect Plum Stampin' Write Marker

Tuesday, January 11, 2011

Birthday Cupcakes


No theme for today's post, but I wanted to share this super cute card (IMHO) that uses the Create a Cupcake stamp set and the Build a Cupcake punch from the Occasions Mini. The design of this card is based on a card sketch by Susie Nelson on the Stampin' Connection (a website for demonstrators). I also used the Confetti stamp set from the main catalogue for the stamping on the white blocks.

Stamps: Confetti, Create a Cupcake
Inks: Daffodil Delight, Tempting Turquoise, Melon Mambo, Soft Suede
Cardstock: Naturals White, Melon Mambo, Whisper White, Daffodil Delight
Other: 1 1/4" Square punch, Build a Cupcake punch, Big Shot Scallop Square die, Brights Patterns DSP

Monday, January 10, 2011

Mini Monday - Nature Walk for You

In my Mini Monday posts, I feature a stamp set (or two) and products from the current Mini Catalogue.


This is a card we made at my Downline Meeting & Info night in January. I was showcasing products from the Occasions Mini and Sale-a-Bration flyer, so this card features four items from the Occasions Mini. I also show a Technique Rewind, where I go back to a past technique from one of my classes and we make a card using the technique. I showed Poppin' Pastels on this card.

I stamped the centre panel with VersaMark using some of the stamps from Nature Walk. Using a Sponge Dauber, I dabbed different coloured Stampin' Pastels over the VersaMark images. This gives a soft, more subtle effect. I also used the Tulip Border Textured Impressions folder from the Occasions Mini to emboss the edge of my card base. I applied a little Frost White Shimmer Paint to the embossed area with my sponge dauber. The sentiment is stamped with a stamp from Say it Simply (also in the Occasions Mini). I love the look of vintage book paper on cards, but haven't ripped apart any books to get my own yet. Now I don't have to, because Stampin' Up! has First Edition DSP which is a thinner than their regular designer papers, and looks like vintage book paper or newspaper. I love it! For this card, I ran a strip through my Tasteful Trims Big Shot die (from the Holiday Mini but still available to purchase). The Decorative Label punch was introduced in the Holiday Mini, and I'm very happy that it's in the Occasions Mini as well... it has become a favourite.

Stamps: Nature Walk, Say it Simply
Inks: VersaMark, Soft Suede, Frost White Shimmer paint
Cardstock: Crumb Cake, Naturals White, Rose Red, So Saffron
Big Shot: Tulip Border TIF, Tasteful Trims die
Punches: Decorative Label, Wide Oval
Other: Stampin' Pastels, Sponge Daubers

Sunday, January 9, 2011

Sketchy Sunday - # 103

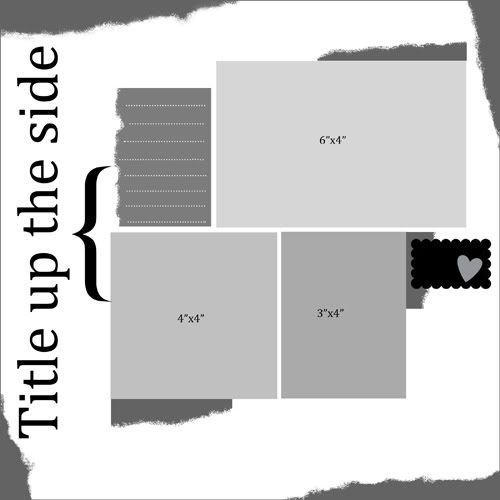
I have a 12x12 scrapbook sketch for you this week...


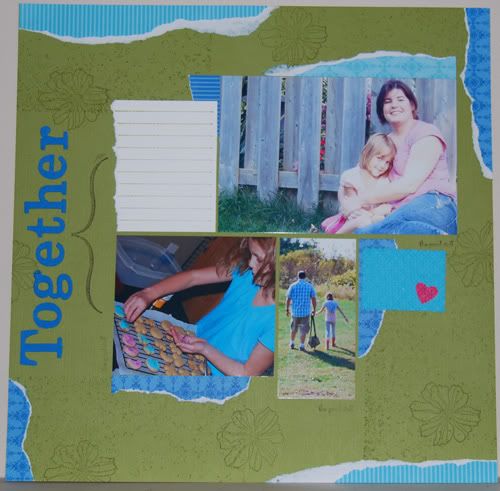
This is the layout we're making today at my Scrapbook Class.


I used the Wonderfully Worn background stamp, Fifth Avenue Floral, and some Big Shot dies for the title and accent. I also used papers from the Bright Patterns DSP pack. There is a lot of paper tearing on this layout, and looking at the layout after it's made, I got the idea to create a mask from torn notepaper to use when stamping the background with the Wonderfully Worn stamp. I'm hoping someone at the class will try that today... I used the Notes & Details stamp set from the Occasions Mini to stamp the journaling card and the bracket as well as the "the good stuff" stamped subtly by each of the photos (you might be able to see it if you click the layout to enlarge it). As soon as I saw that set, I knew it would be perfect for scrapbooking.

Stamps: Wonderfully Worn, Notes & Details, Fifth Avenue Floral
Inks: Old Olive, Early Expresso
Cardstock: Old Olive (textured), Tempting Turquoise, Melon Mambo, Whisper White, Brilliant Blue (textured)
Big Shot: Timeless Type sizzlets, Scallop Rectangle Clearlit, Square Lattice TIF
Other: Small Heart Punch, Brights Patterns DSP pack

Saturday, January 8, 2011

Step it up Saturday - Medallion Medley

The Medallion Medley Simply Sent Kit, and Say It Simply stamp set in the Occasions Mini make it so quick and easy to create a pretty card. All I added to the first card was Rich Razzleberry ink to stamp the sentiment. There are extra labels, in case you don't always stamp perfectly the first time (I hope I'm not the only one with that problem)! The cards are pre-printed, and the green medallion is also dry embossed.

I stepped up the second card with Rich Razzleberry Satin Ribbon, a Neutral button and some Linen Thread. This is still a very quick and easy card (under 5 minutes), but it's a step above the first one.


Stamps: Say it Simply
Inks: Rich Razzleberry
Other: Medallion Medly Simply Sent Kit, Neutral Button, Linen Thread, Rich Razzleberry Satin Ribbon

Friday, January 7, 2011

Fast & Fun Friday

This card is one of the thank you cards I'll be sending out with my January orders... this card is so quick that I made four in less than ten minutes!


1. Cut your background cardstock (Crumb Cake) to 3"x6". Fold into a 3x3 card.
2. Cut First Edition DSP into 2 1/2"x2 1/2" squares. Crumple up into a ball, and then open up again (don't make it too flat).
3. Cut Very Vanilla cardstock into 2"x2" pieces. Stamp an image and sentiment onto the cardstock (I used Rich Razzleberry ink and my Clearly for You stamp set).
4. Glue your crumpled First Edition DSP onto your card base (don't glue the edges down).
5. Adhere your stamped cardstock with Stampin' Dimensionals.