Friday, March 28, 2014

March Paper Pumpkin Bonus Cards

I think this might be my favourite Paper Pumpkin kit yet! I love the pattern on the card bases, I love how easy it was to line up the patterned Photopolymer stamps, and I loved the touch of glitter and shine (the gold envelope liners were a fun bonus and it was easy to cut a bit off the bottom to use on the cards). And the wood sentiments!!! So fun! So, here's what I came up with, using the supplies from this kit, a few things from the first kit everyone gets (I used the Hey There, Friend stamp and Basic Gray ink spot), and a few extra bits and pieces I send out to everyone who gets their Paper Pumpkin kit from me (these went out in the mail today... e-mail instructions are almost done).

These are the cards Stampin' Up! designed with the kit:
 I punched the gold 2 1/2" circle from one of the gold envelope liners:
 more gold strips from the envelope liners, and I used both of the stamps and ink spots to add colour and pattern to the base:
 I added a Scallop Top Tag, and stamped all over with one of the stamps in the kit:
 This one uses the sentiment and ink from the first kit everyone gets, and a few strips of co-ordinating card stock, plus a little bit of Baker's Twine.
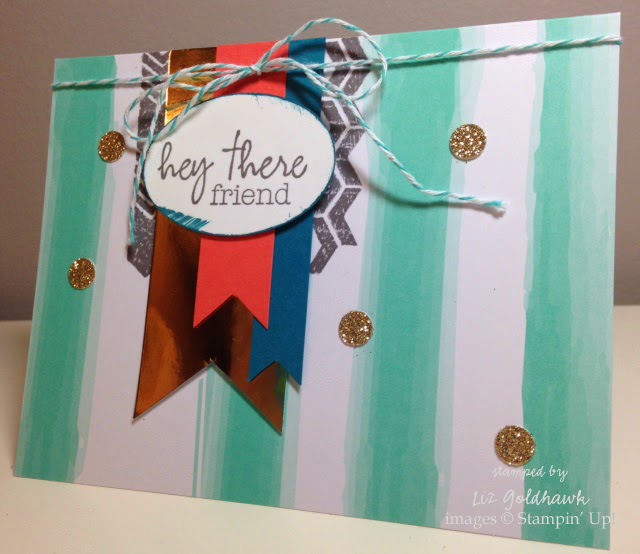
I folded the front (printed) side of the card base at 2 1/8" so it would fold back to make this Z-fold card. I used both stamps and inks (I love how easy it was to line up the chevron pattern on the Calypso Coral oval I added):
For this one, I cut a strip from the card front to add to a Crumb Cake card base. I added a torn strip of card stock and some gold banners cut from the envelope liner. I also cut the wood sentiment word apart to get a different look:
This one uses the rest of the printed card front (left from the card above) and I added an embossed piece of Island Indigo card stock as well as a Naturals White card base. The wood sentiment is layered over a strip of gold cut from the envelope liner:

I hope you like what I did with the kit this month! Don't forget that if you sign up by March 31st, you'll get a pack of 2012/14 In Color Markers ($19.95 value) for free! And if you sign up through me, you'll get the supplies and instructions to make bonus cards every month!

Monday, March 17, 2014

March 2014 Paper Pumpkin Kit


I got my March Paper Pumpkin kit today, and I'm so excited to play with it! We get supplies to make eight super cute cards, and of course I can't just follow the 'rules' (or instructions in this case) and my mind is already coming up with some other super cute ideas using the supplies! I love the stamps, the wood sentiments and the watercolour stripe card bases. Super cute colour combo too! Stay tuned... I'll share what I come up with... for now, you can see the cards designed by Stampin' Up! in the video.

Tuesday, March 4, 2014

Around the World Challenge #12

 This month we're working with sketches! This challenge is open until March 13th, and I hope you'll play along! You can add your link to the challenge blog here: Around the World Challenge #12. The design team has come up with a lot of beautiful samples to inspire you.


And here is the card I created for the sketch:


I used the Vivid Vases stamp and Happy Watercolor stamps. I also used the Banner Blast stamp set and Banner Punch. I added some pearls and Washi Tape to finish off the card.

Monday, March 3, 2014

February Paper Pumpkin Bonus Projects

February's Paper Pumpkin kit included five gift bags, die cut bermuda bay circles, alphabets and starbursts and two photopolymer stamps (stripes and dots) and a Pistachio Pudding ink spot, as well as white grosgrain ribbon and Baker's Twine. If you subscribe to the kit through me, you'll get the supplies, instructions and photos to make the bonus projects too!

On this bag, I stamped the patterned circles with Pistachio Pudding ink. 

On this bag, I glued the circles, stamped starbursts and letters directly to the bag instead of hanging them from the twine with the clothespins.

On this bag, I punched out the letter circles from one of the alphabet sheets, then glued it to the bag. I used the Pistachio Pudding ink on the back of the Bermuda Bay circles, then cut the leaves. I flipped over three letter circles to use the white side. I punched some flowers from one of the bags (after I cut it apart for other projects).

 This card uses pieces cut from one of the bags. I tied the twine through the grommets of the bag after stamped the pieces with Pistachio Pudding ink and the splatter stamp from the Welcome Kit (the first kit you get when you sign up). The sentiment is also from the Welcome Kit. Bermuda Bay card stock was embossed with the Decorative Dots embossing folder.

This card also uses a piece from the bag I cut apart. I made a tag (stamped with the splatters again). I glued on the Bermuda Bay circles and the stamped starbursts to the tag. The sentiment was stamped on the back of a Bermuda Bay circle. 

I had one more piece left from the bag I cut apart, so I created this tag! I stamped the tag with the patterned circle stamps from the kit. I layered the circle, stamped starburst and letter circles.

I hope you enjoyed my bonus projects this month!

Wednesday, February 19, 2014


I had seen this card made with the Scallop Tag Topper Punch a few places (great video by Stamping T! to show you how) and when I saw one like this by Laura Mackie on Pinterest, I knew I had to make it for this month's Stepped Up Cards Class. The card isn't very hard once you know how to make it, and this one has a little window and features the Happy Watercolor stamp set. I used Baked Brown Sugar and Crisp Cantaloupe ink. A bit of Very Vanilla Seam Binding ribbon ties it closed. I took a few gold sequins off the trim to glue onto the card.

Thursday, February 6, 2014

Happy Watercolor

This was my favourite card from my January Simple Cards Class...


It features the Happy Watercolor stamps from the Occasions Catalogue, and I also used the Travel Journal wheel (I took it off the wheel and mounted it on Cling Foam because I find it easier to use that way. I used a Clear Block and markers (Soft Sky, So Saffron and Wisteria Wonder) to create the coloured stripe behind the flower. I just scribbled the marker on, spritzed with water so the colours blended a little, and stamped it on the Whisper White card stock. I used the Heat Tool to speed up the drying and stamped the Travel Journal with Sahara Sand. The flower and sentiment are stamped with Jet Black StazOn. I've been liking the white on white layering lately, and for this card, I embossed the middle white layer with the Beautifully Baroque embossing folder.

Thanks for visiting!

Wednesday, February 5, 2014

January Paper Pumpkin Bonus Projects

I really liked the January Paper Pumpkin kit... the card bases were die cut with peekaboo windows, and you could use the patterned side or the crumb cake side with the colour peeking through. The stamps were cute too, and there were lots of card stock stickers and four paper doilies. The kit came with four card bases, so I created two as they were shown in the instructions:

I cut apart the two remaining card bases to make four more cards (so six total) and still had stickers and doilies left over. Here are the four extra cards I created:
For this card, I added a Naturals White card base, a 2 1/2" circle of Silver Glimmer Paper and the stamped and die cut sentiment from Starburst Sayings.

For this card, I cut around the 'leftover' sticker outlines from several of the hexagon stickers in the kit. This kit came with a free gift of the In Color Boutique Details which co-ordinate perfectly with the kit, so I used two of those as well. Other than that, I just added the Strawberry Slush card base.

For this card (I was trying to keep it more masculine and simple... but then I realized that it uses Calypso Coral which isn't really a masculine colour.... so I'm not sure I succeeded). I only added a Crumb Cake card base to the kit supplies.


This card also only uses kit supplies other than the Basic Grey Card base.

If you like what you see, this is the perfect time to try out the Paper Pumpkin Kit. If you sign up by February 10th, you'll get a free pack of 2012/14 In Colour Markers ($19.95 value). Your kits ship right to you around the middle of the month, and if you choose me as your demonstrator, I mail you the supplies and e-mail the pictures and instructions for you to make the bonus projects by the end of each month!